


Key Topics
- Accounting Module Guide
- Inventory Module Guide
- Item Maintenance Guide
- Maintenance Module Guide
Help or comments?


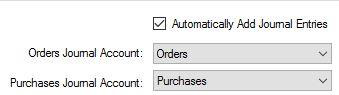
ACCOUNTING SETUP
- Select the account for orders and purchases
- Now go to the Maintenance Module —> Settings
- From the Accounting Module click the Chart of Accounts tab
- Add an account for orders and purchases (remember to save each one)
- Click “Automatically Add Journal Entries”
- Click “Save Settings” at the bottom right of the screen
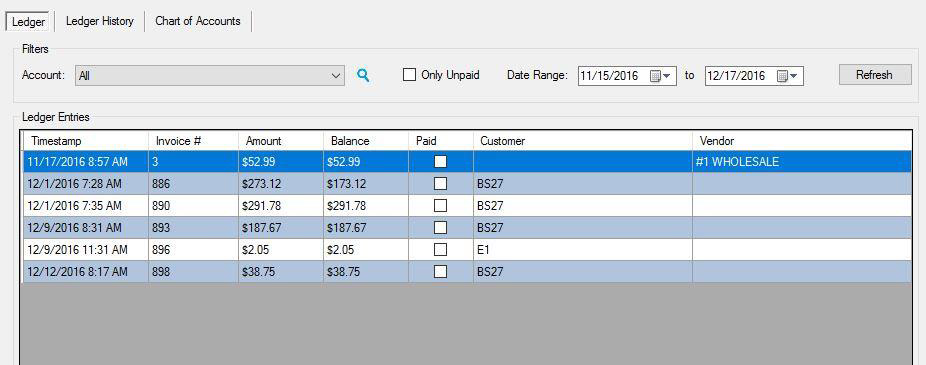
LEDGER
The Ledger tab shows:
- Customer / Account invoice was for
- Balance left on the invoice
- Invoice numbers
- Time stamp of the invoice
- Amount of the invoice
- If the invoice is paid or not
- Vendor (if the invoice is for a purchase order)
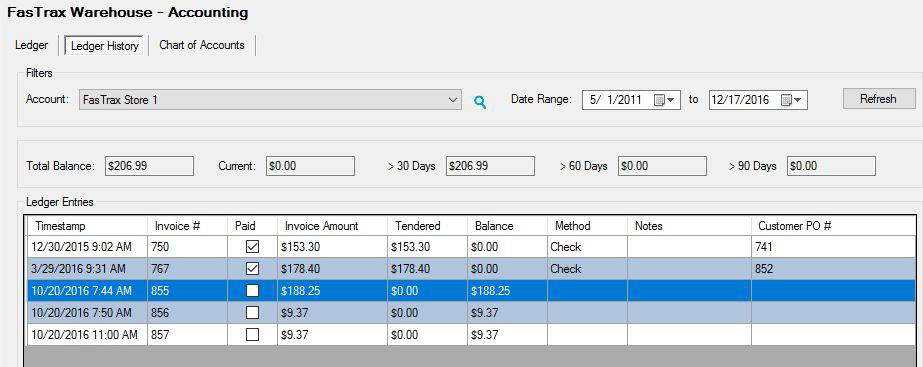
LEDGER HISTORY
The ledger history allows you to look up an account and the balance they owe.
It is broken into:
- Total Balance
- Current Balance
- Balance greater than 30 days
- Balance greater than 60 days
- Balance greater than 90 days
- Method of payment
- Any notes that are entered along with payment
- Customer’s PO number
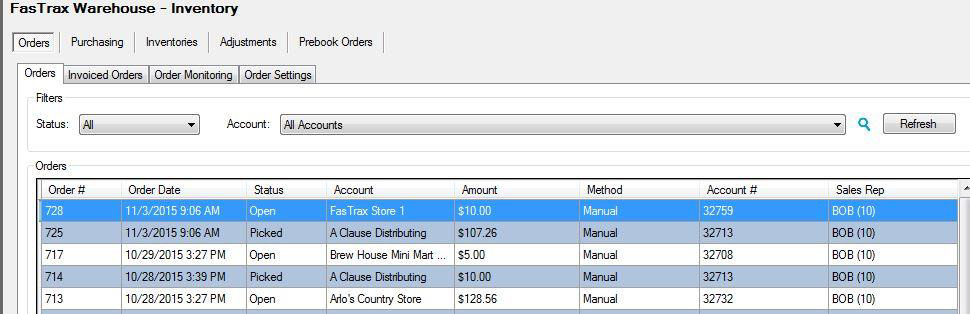
HOW TO CREATE A NEW ORDER
- Open FasTrax Warehouse and click on the inventory module
- From the orders tab, click “New” at the bottom left of the screen

- Select the account that the order is for, add a PO# (if available), the salesman, and the order date
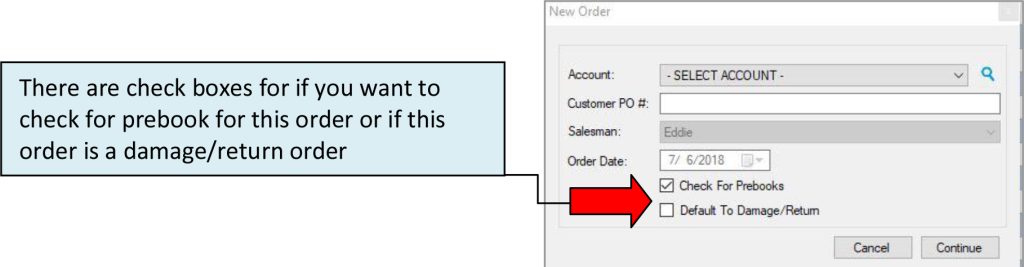
- Click Continue
- Click Add

- Enter the item number and press enter
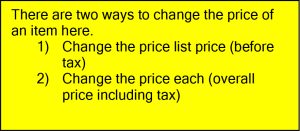
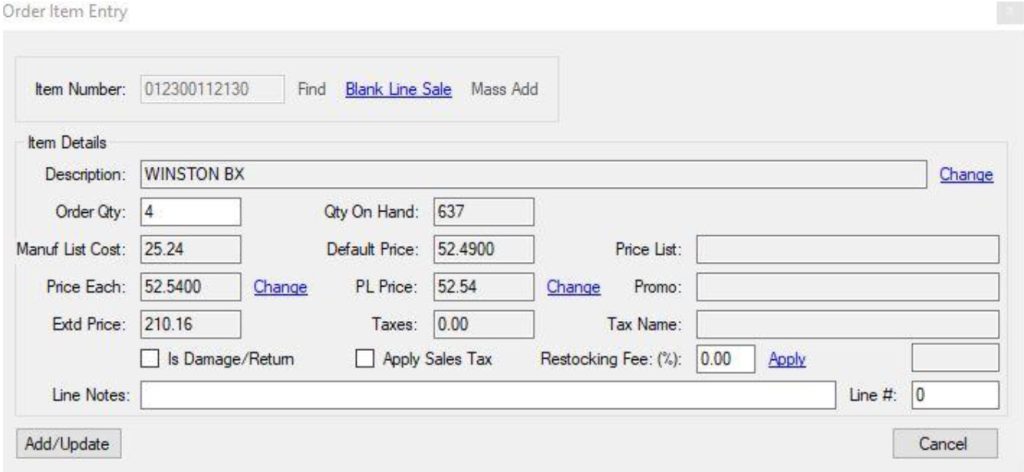
- Enter the order quantity
- Click Add/Update
- Continue until all items are added
- Once all items are entered click Exit
HOW TO PICK AN ORDER
- Select the order form the orders list
- Click Pick from the bottom of the page

- From here there are two options
- Click in the “Invoice Quantity” box and enter the quantity for each item
- Click “Fill” from the bottom of the page and change any quantity that does not match the ordered qty
- If the order is complete then click Close/Invoice to finish the order
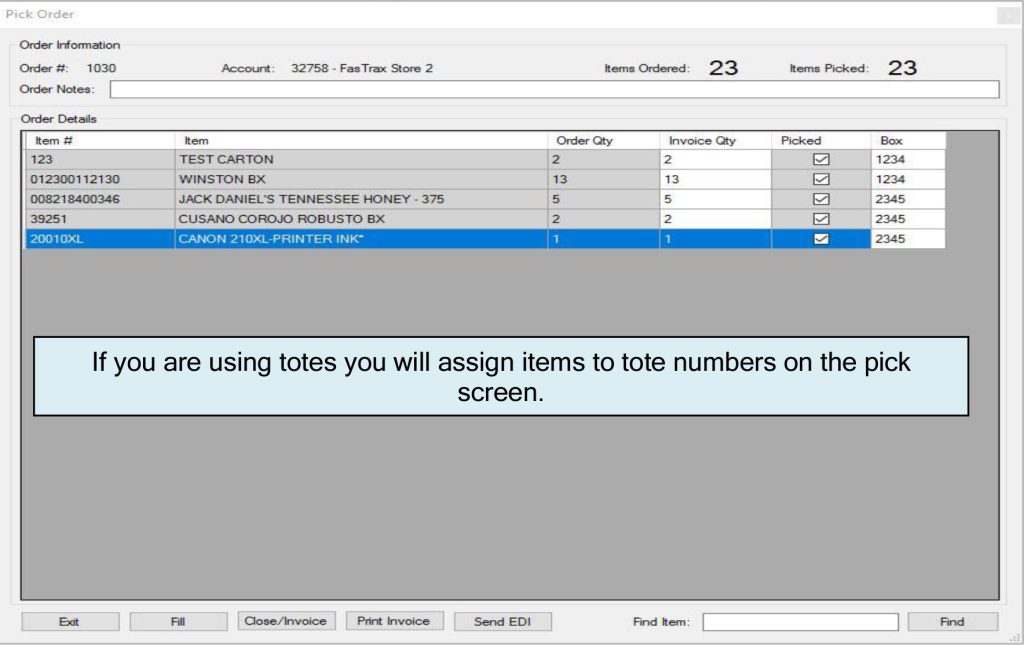
- If you are sending the invoice by EDI click the Invoiced orders tab
- Select the order
- Click Send EDI
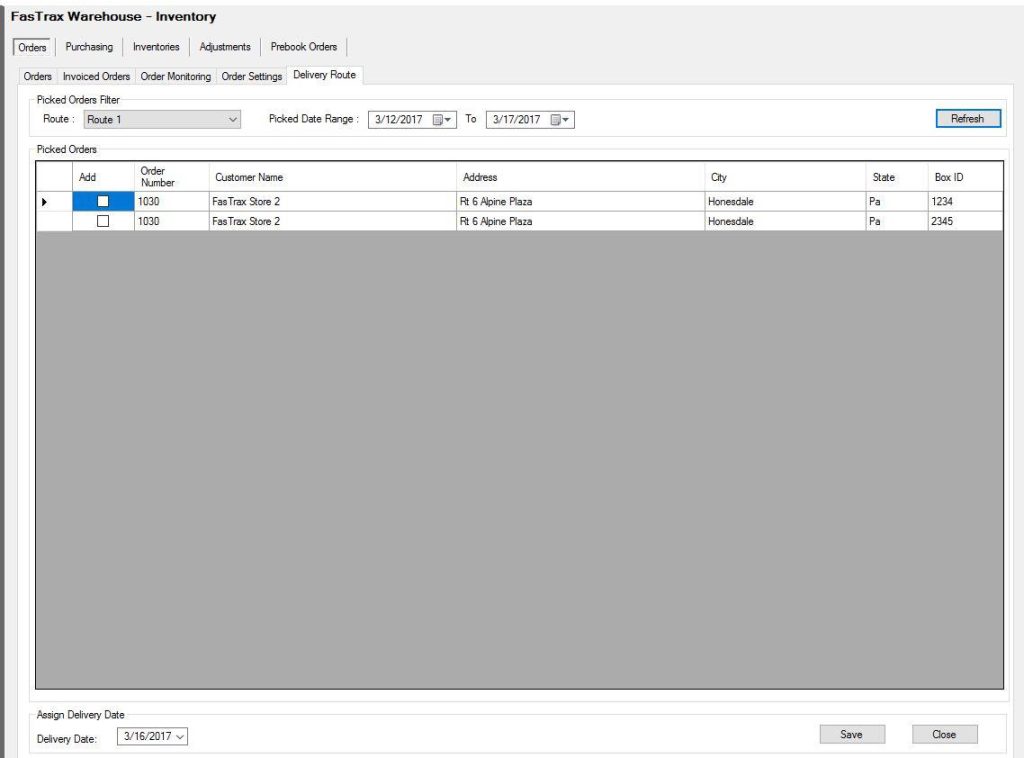
- Once the order is picked and items assigned a box number; the order will show under Delivery Route
- From here you can also set the delivery date
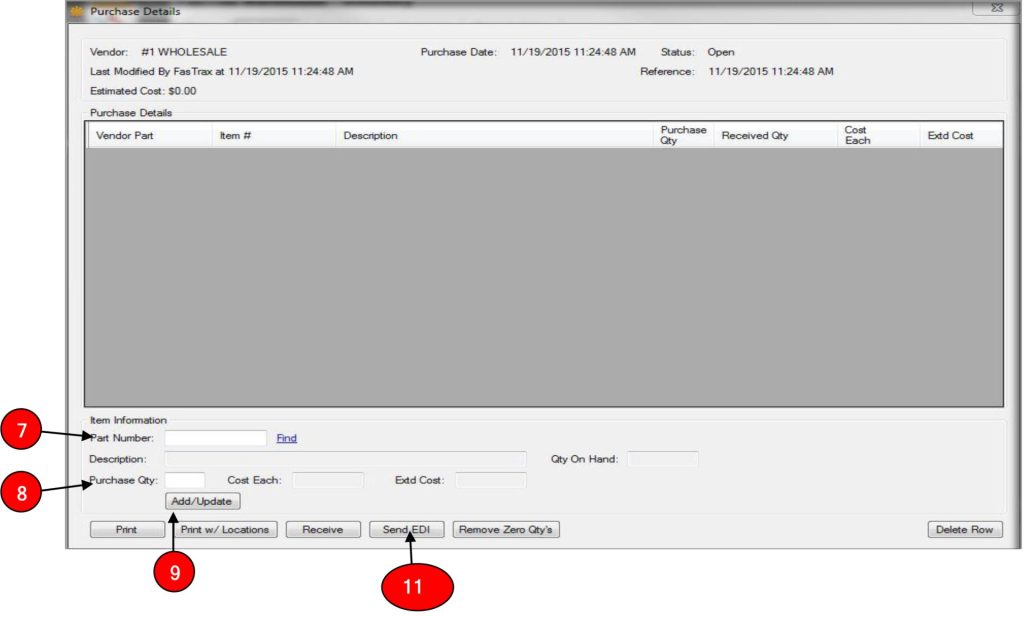
HOW TO CREATE A PURCHASE ORDER
- Click on the Purchasing tab
- Click on New at the bottom of the page

- Select the vendor the order is for
- ) Enter your reference number if you use them (if not it will default to the date)
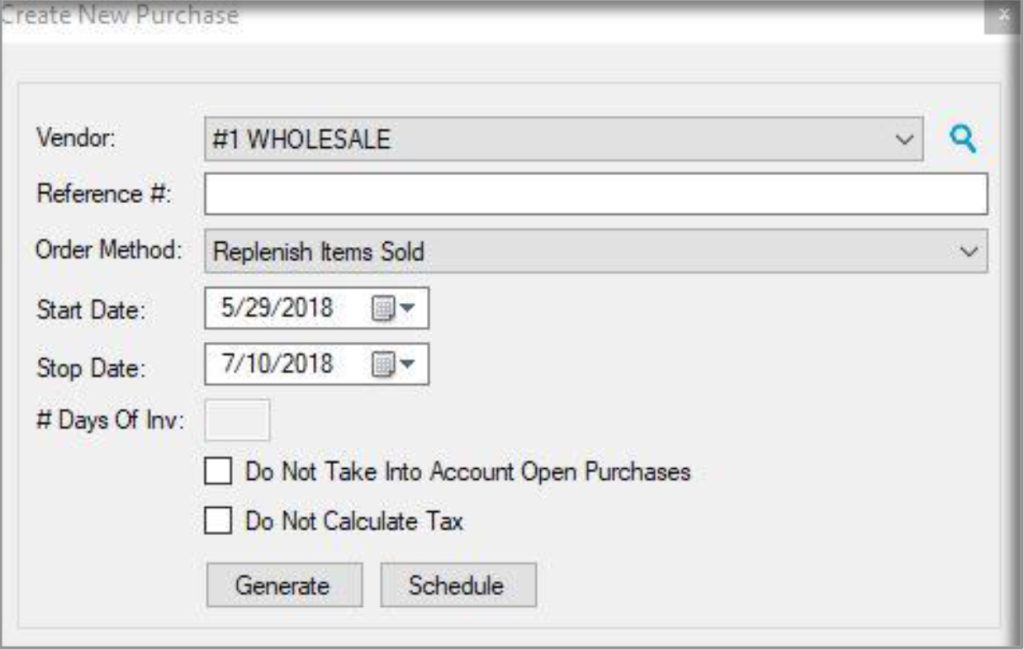
- ) Select the order method and enter any information that is needed for that method

- Click Generate Purchase

- a) You also have the option to set a schedule for the order to run weekly or monthly
- Enter the part number you wish to order
- Enter the purchase Qty
- Click Add/Update
- Repeat until all items are added
- When finished click Send EDI to send your order
HOW TO RECEIVE AN ORDER
- From the Purchasing tab select the order you need to receive
- Click Receive from the bottom of the page

- Enter the invoice number

- Select the invoice date
- There are two options to enter the received amounts
- a. Click the “Set Rcv Qty To Order Qty”
- b. Click inside the Received Qty box and enter the quantity received
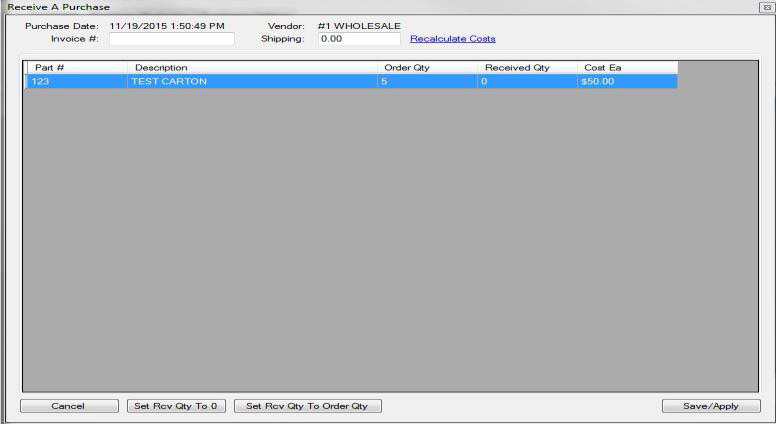
- Once you have entered all the quantities click on the Save/Apply button
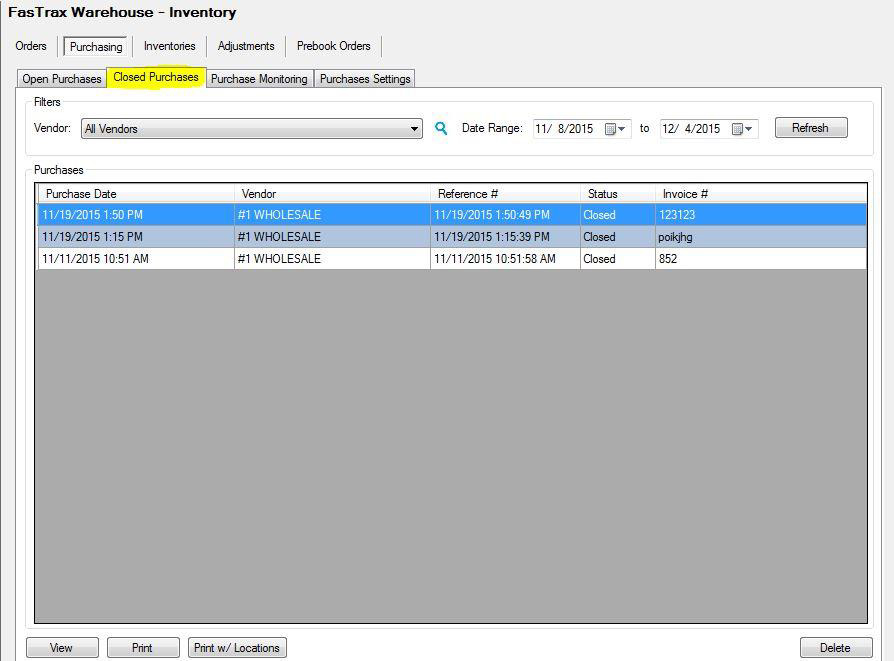
- The order will now show under the Closed Purchases tab
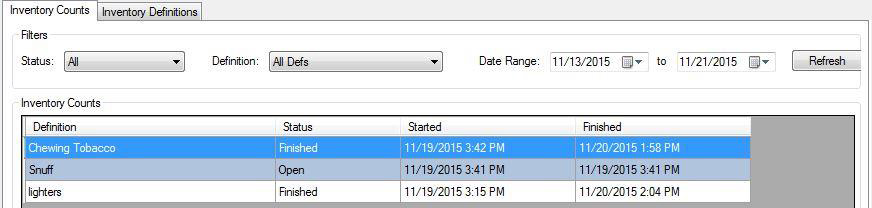
INVENTORIES
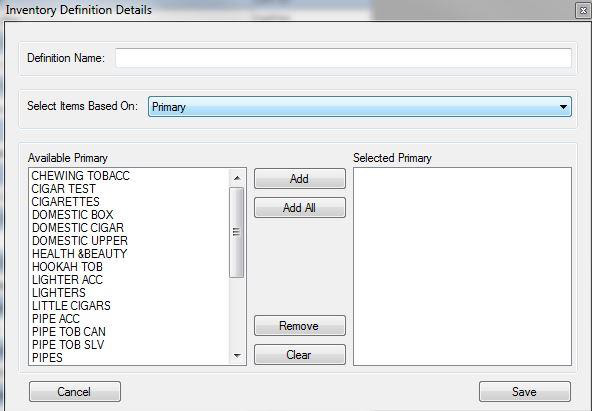
- From the Inventory module navigate to the Inventories tab
- Click on Inventory Definitions to create your definitions that you will do inventory with
- Click Add
- Create a definition name
- Select what you will base the items from
- Add the categories you want to include in this definition
- Click the Save button
- Click on the Inventory Counts tab
- Select your definition
- Click Start
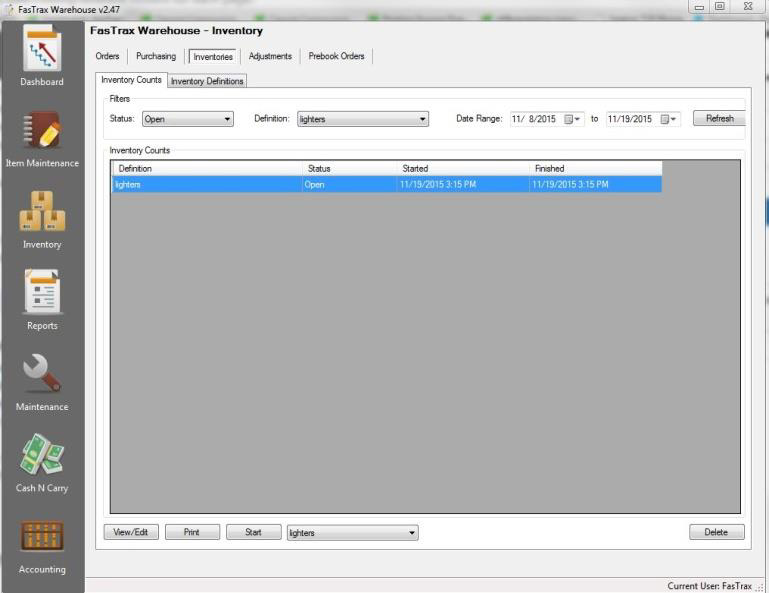
- Click on View/Edit to enter data for the count
- Enter your counts in the User Qty column

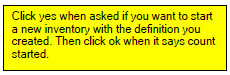
- Once you have entered all of the counts click Save (Reconcile)
- On the pop up box click Yes to apply the counts to inventory
- Click OK to close the box showing the inventory has been reconciled
- Close the inventory worksheet by clicking the red “x” at the top right of the window
- The status of the inventory count will now show finished
ADJUSTMENTS
- From the Inventory module navigate to the adjustments tab
- Click New
- Enter notes to help identify why the adjustment was done
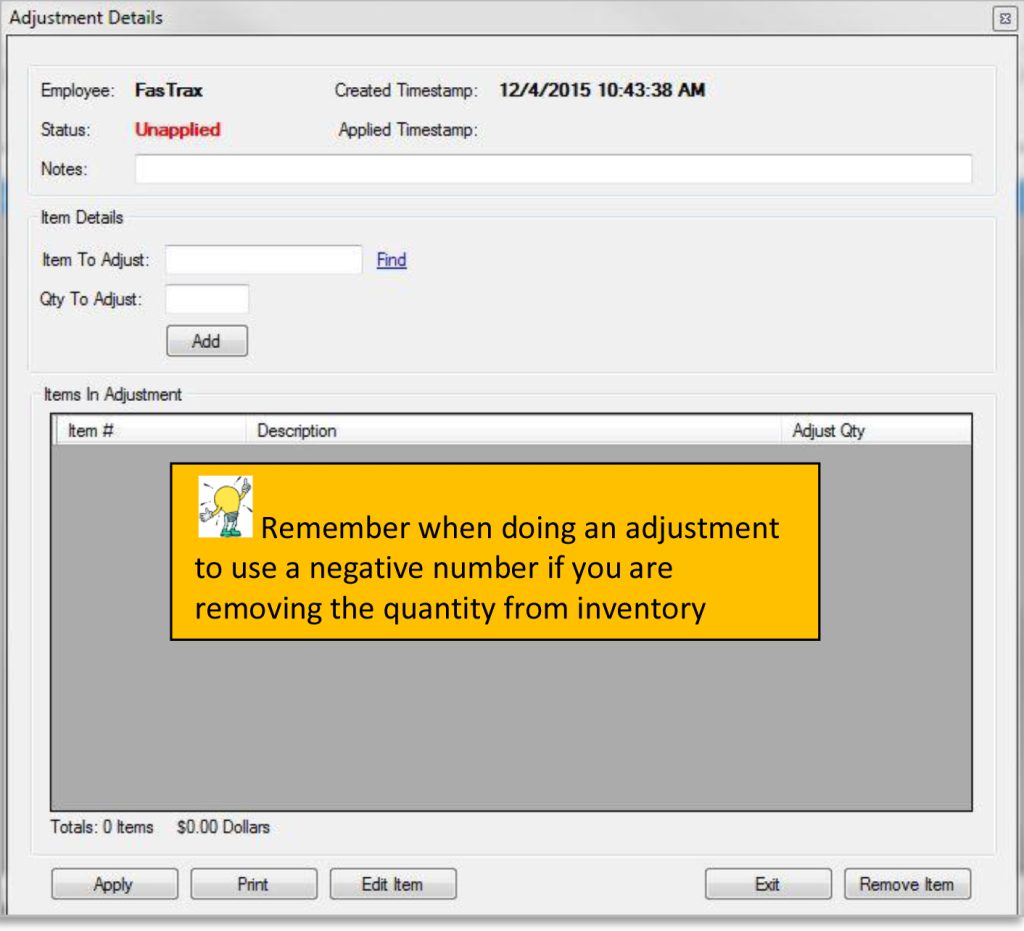
- Click Find to enter the item to be adjusted
- Enter the quantity to adjust
- Click Add
- Continue until all items that need adjusting are entered
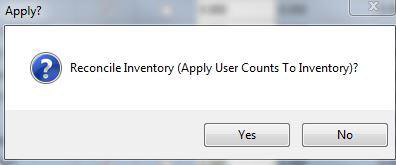
- Click Apply
- Click Yes when asked if you want to Apply Adjustment To Inventory
- Click OK
- The Adjustment now shows as being applied

PREBOOK ORDERS
![]()
- From the inventory module select the Prebook Orders tab
- Click Add from the bottom of the screen

- Enter the Prebook Name, Start Date, and any notes you may want to add
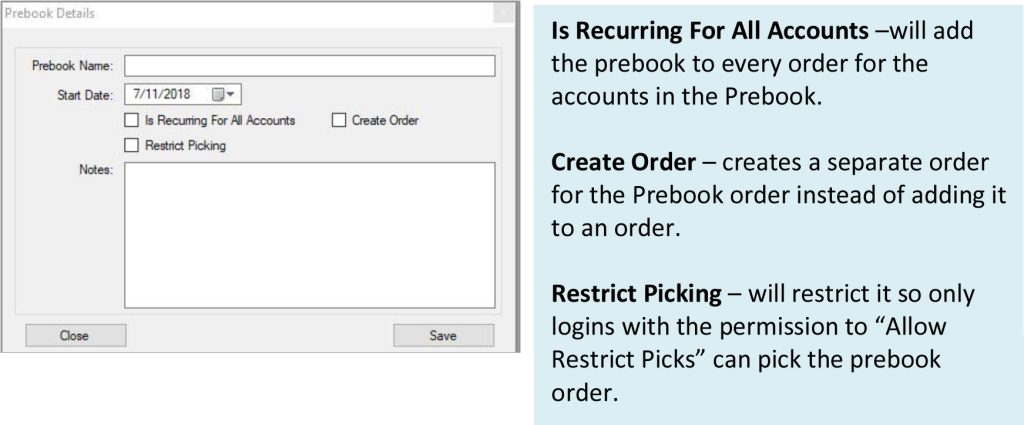
- Click Save
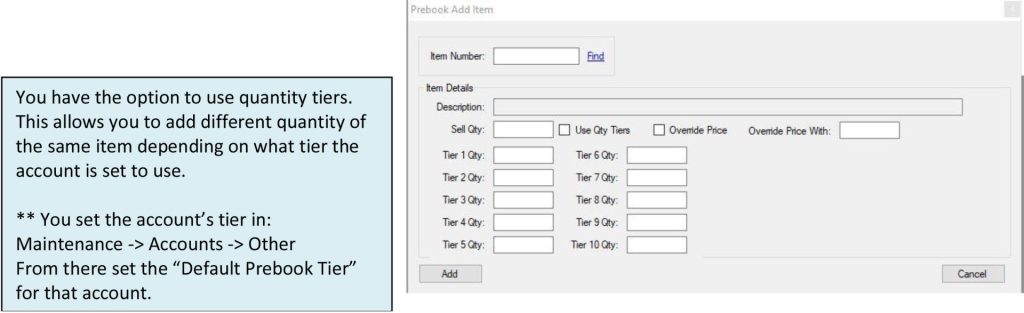
- Select the Prebook and click Items in Prebook
- Enter the Item number and Sale Qty

- a. If you want to over ride the price, check the box and then enter the price you wish to sell the item for
- Click Add Item To Prebook
- After entering all items for the prebook click Close
- Now click Accounts In Prebook
- From here you can add individual accounts, account groups, or select all accounts
- Once all accounts are added click Close

HOW TO ADD A NEW ITEM
- Open the FasTrax Warehouse program
- Select your user name and enter your password
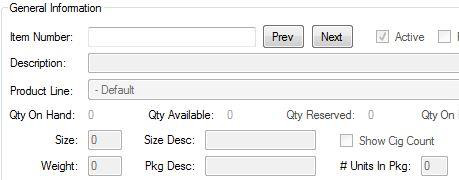
- On the left side of the Warehouse screen, select the Item Maintenance icon

- To add a new item, click the Add Item button located at the lower right

- In the General Information section, type the Item Number, Description, and select the Product Line for the item you are adding
- Under Cost Information enter your Last Cost, Manufacturer List Cost, Default Price, and the MSRP

- Under MSA Information section, add any MSA information to the item that it is needed
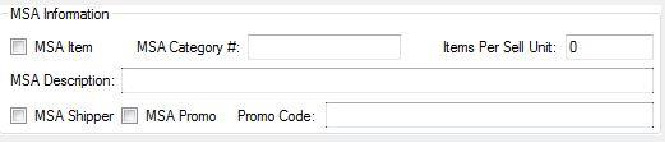
- Select the Save Item button at the bottom right
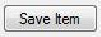
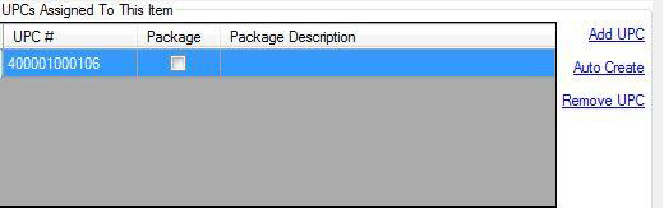
HOW TO ADD A UPC TO AN ITEM
- From Item Maintenance, Locate UPCs Assigned tab
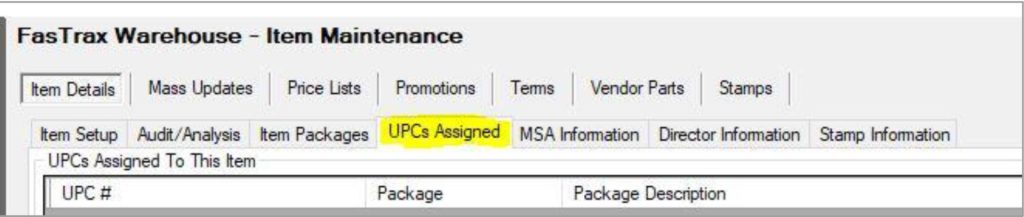
- Click the Add UPC button at the bottom right of the page
- Enter the UPC for the item and click Save
- Now the UPC shows up in the UPCs Assigned To This Item box
HOW TO ADD A PROMOTION
- From the Promotions tab click the Add button

- Name the promotion, assign the amount to be discounted, and set the running date of the promotion.
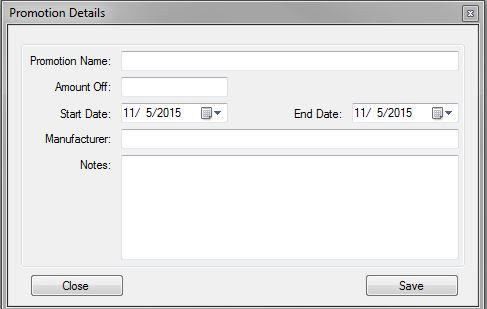
- Click Save
- Highlight the promotion you just created; click Items In Promo
- Enter the item number you want to add and click Add Item To Promo
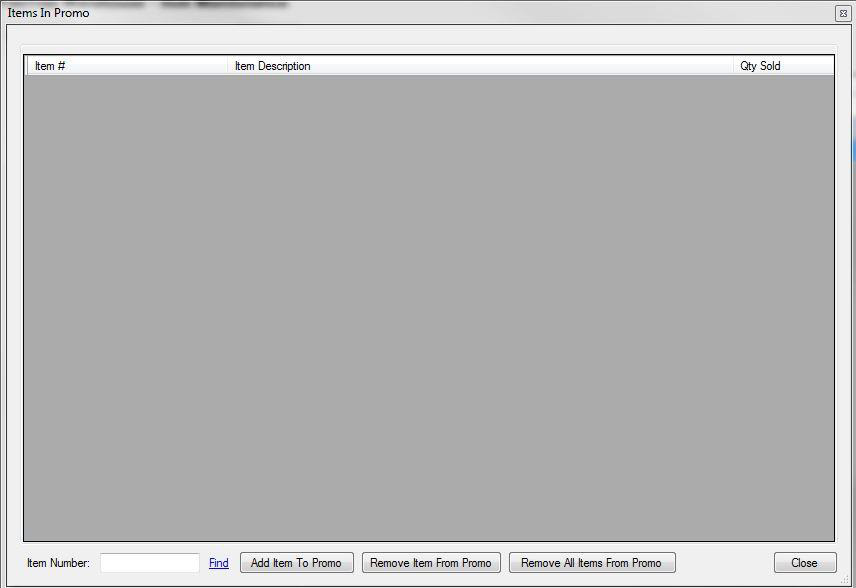
- Once you enter all the items for the promotion, click close
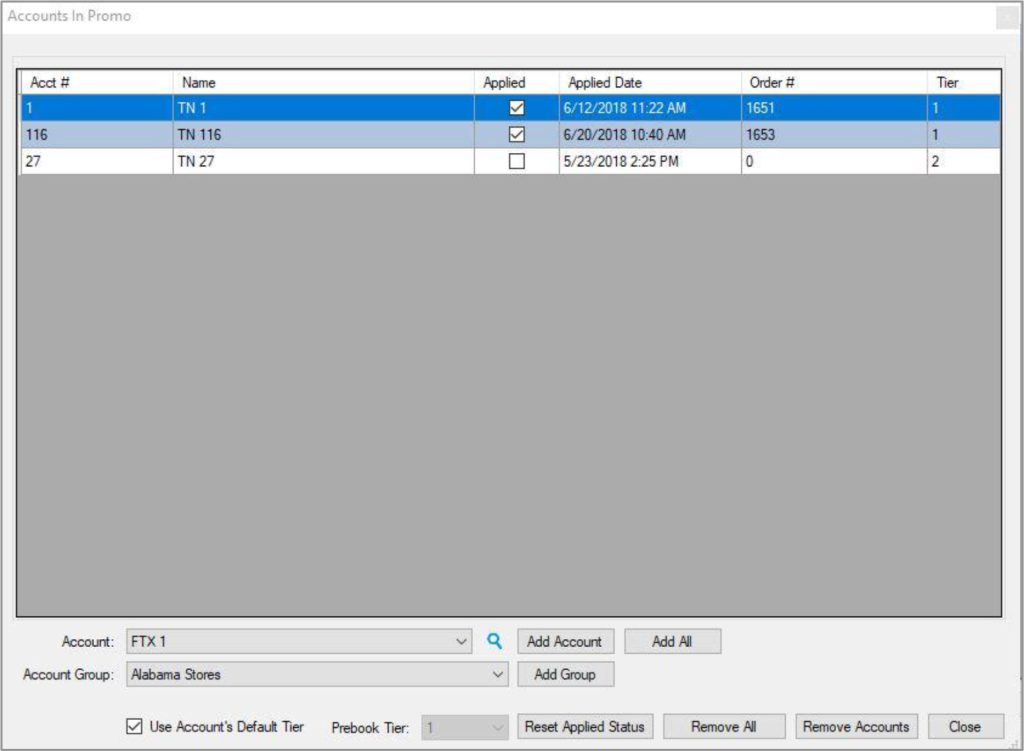
- Now click Accounts In Promo to add customers who will receive the promotion

- There are 3 options to adding accounts
- a. Add a single account
- b. Add an account group
- c. Add all accounts

- Once all accounts are added for the promotion click Close
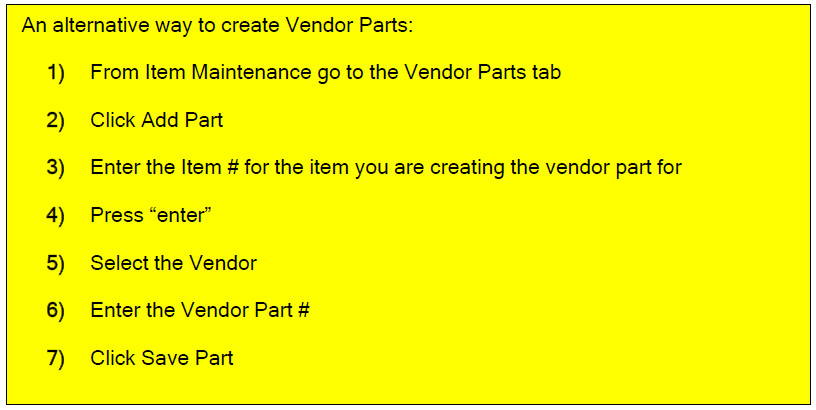
HOW TO ADD A VENDOR PART
- From the Item Details tab, type in the item number that you want to create a vendor part for
- Under Vendor Parts on the bottom right, click Add Part
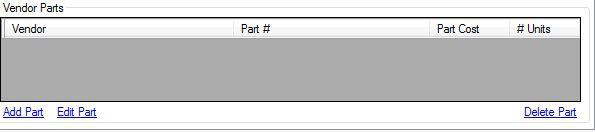
- Enter the Vendor, Part #, Part Cost, and the # of Units
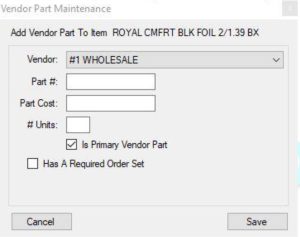
- Click Save
PRICE LISTS
- From the Item Maintenance click on the Price Lists tab
- Click Add
- Enter the name for the new price list
- Highlight the price list you created and click Edit

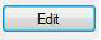
- Select the product line you want to set and click edit
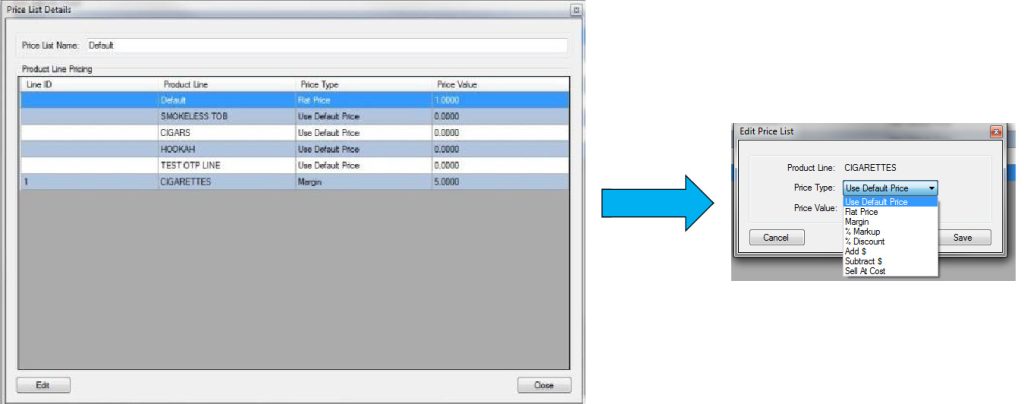
- Select the price type to be assigned
- Set the value for the price type (if you selected default price or sell at cost, skip this step)
- Click Save
- Continue until you have all product lines complete
- When finished click Close
TERMS

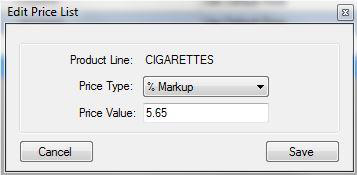
- From Item Maintenance, choose Terms and click add
- Give it a name and set the amount off
- There are two discount types – Dollars Off and Percent Off
- Click save
- Now add items by clicking the Items In Terms
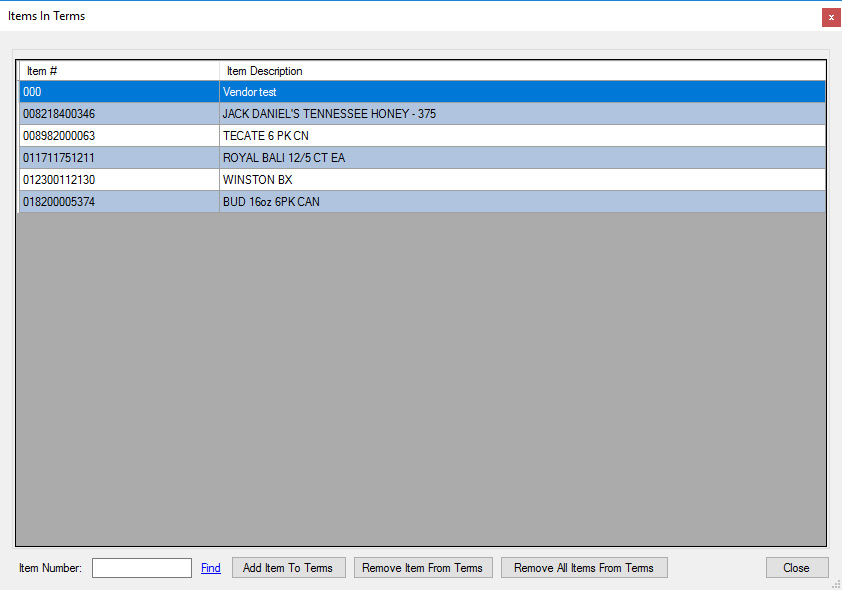
- From here you can enter the item number to add or click find to search for the item
- Click Add To Terms once you have the number entered
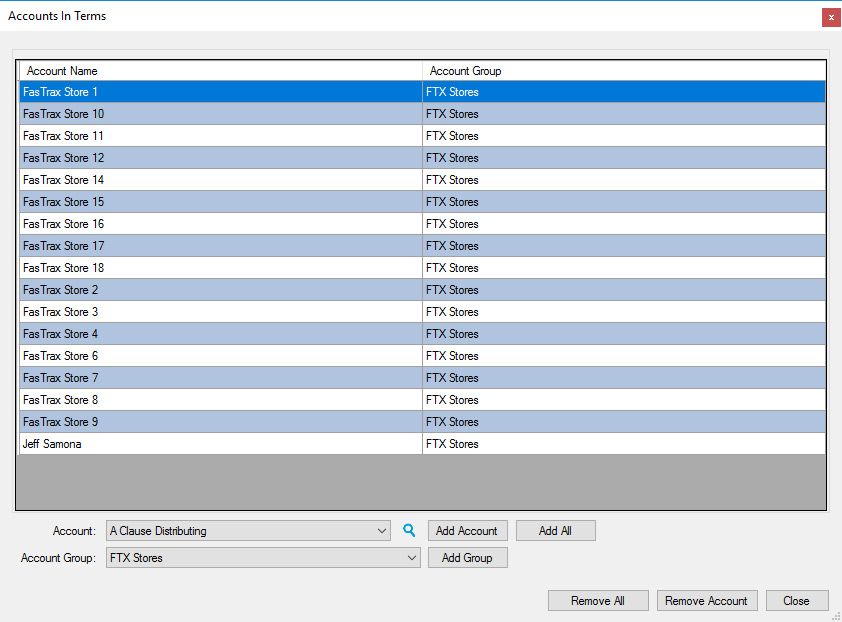
- To add customer to the Term, click Accounts In Terms
- From here you can add a single account, an entire account group, or all accounts.
- To add an account, select the account and click Add Account
- To add groups, select the group and click Add Group
- The Add All button will add all accounts to the Terms
ITEM DETAILS
- Audit / Analysis
- a. Audit Information shows when the item was created and the last time it was updated.
- b. Analysis
- Order History shows all orders that have the item on it.
- Purchase History shows all purchase orders that the item is on.
- Change History shows when the price has changed on the item
- Adjustments show any adjustments that have been done on the item.
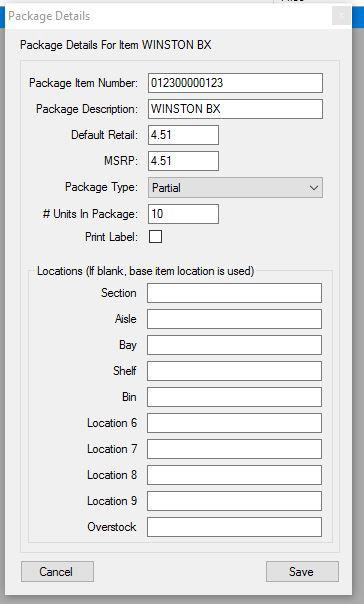
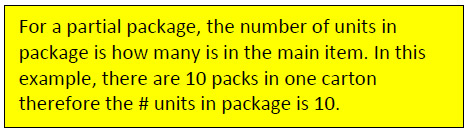
- Item Packages are used if you are selling partial item. For example if you sell individual packs from cartons.
- a. Click add package
- b. Enter an item number for the package
- c. Enter a package description
- d. Enter the default retail and MSRP
- e. Select if it is a partial or full package type
- f. Enter the number of units in the package
- g. Click Save
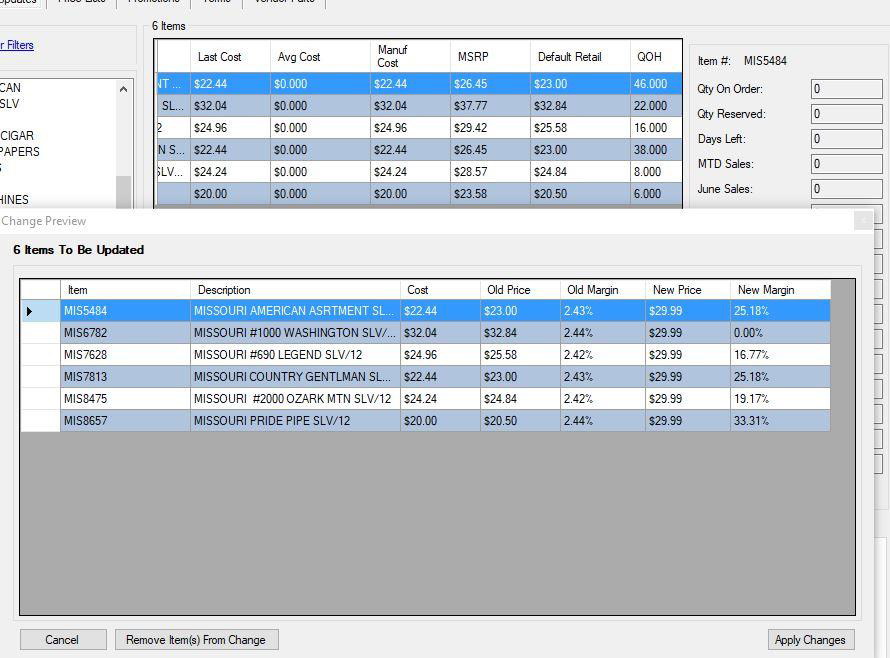
MASS UPDATES

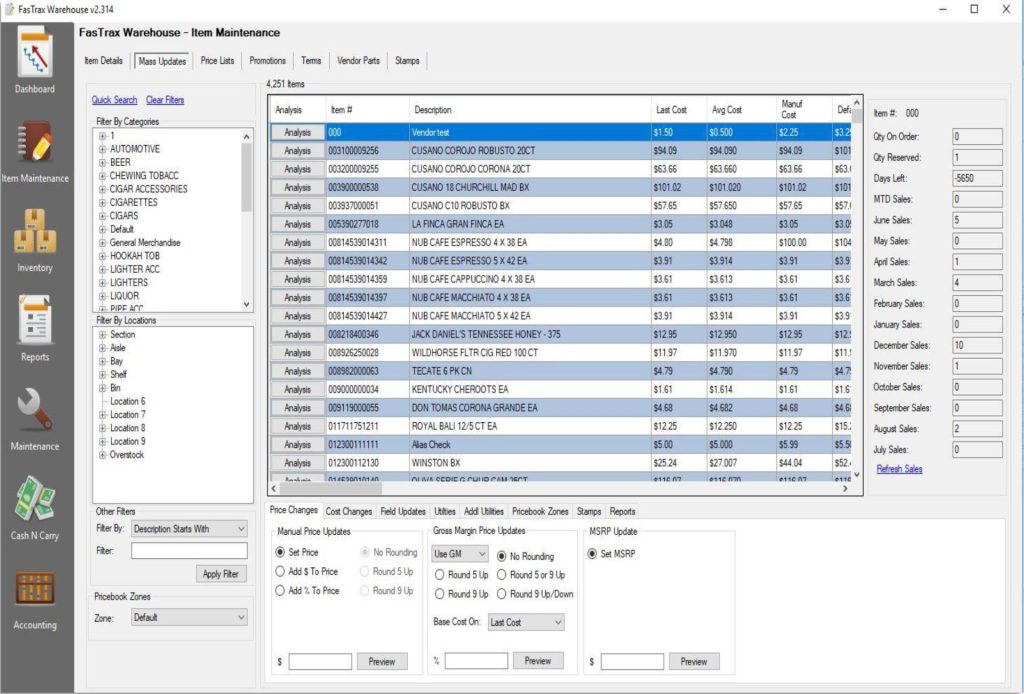

There are eight tabs in Mass Updates:
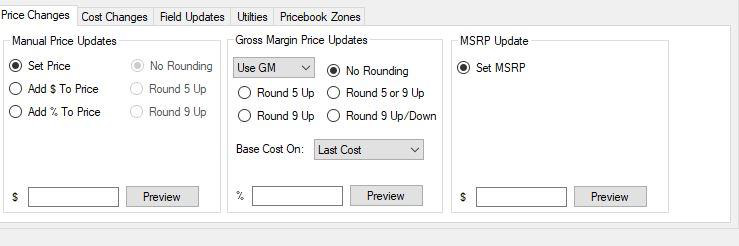
- Price Changes – Change the price, gross margin / markup, or set the manufacturer suggested retail price for items

- Cost Changes – allows you update the last cost / manufacturer list cost of items
- Field Updates – allows you to change the categories for items
- Utilities – allows you to create vendor parts for items (uses the item number to create the part number), add items to promotions, terms, or prebooks
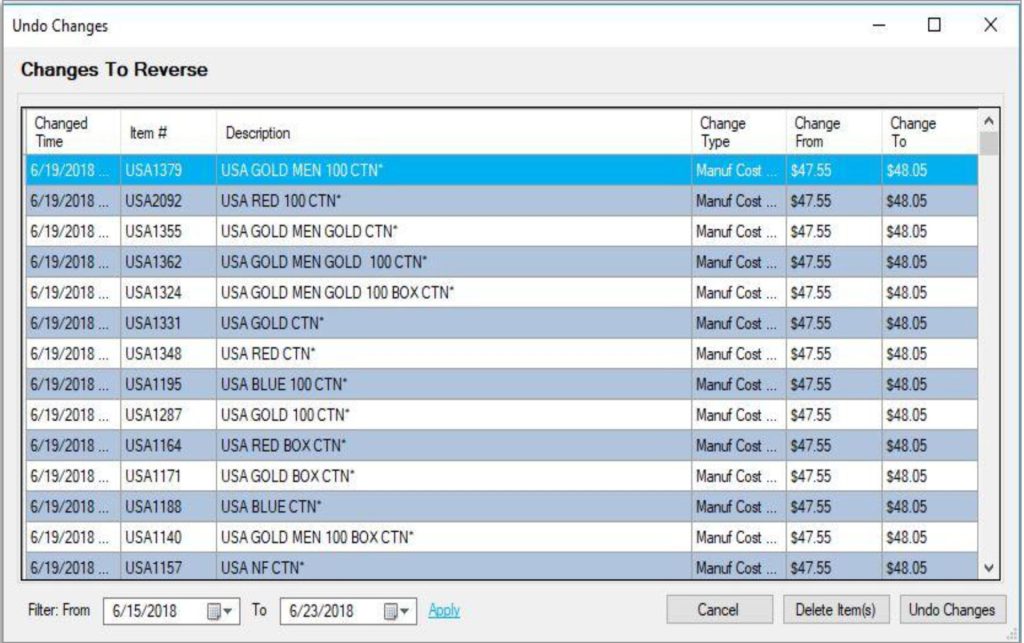
- Additional Utilities – allows you to undo changes; if you accidentally put an incorrect price or cost, this will allow you to go back and undo those changes
- Pricebook Zones – allows you to set the price of items in pricebook zones
- Stamps – allows you to add multiple items to a particular stamp
- Reports
- a. Price List Report – shows items, description, and price (has option to show costs and suspect items)
- b. List Reports
- Item Number List – Tree info – shows item number, description and categories
- Item Number List – UPC info – shows item number, description, cost, price, and UPCs
- c. Vendor Part Report – shows items from a specific vendor (list includes item number, description, last cost, price, margin,
vendor part number, and number of units in the part
STAMPS
- Click on the stamps tab
- Go to Stamp Groups
- Click “Add Group”
- Enter the name of the group and click save
- Now go to Stamp Details
- Click on Add Item under general information
- Enter the name of the stamp and click ok
- Give the stamp a name (it can be the same as the Item name)
- Select the group that the stamp will belong to
- Under value enter the amount of the stamp

- Click save item
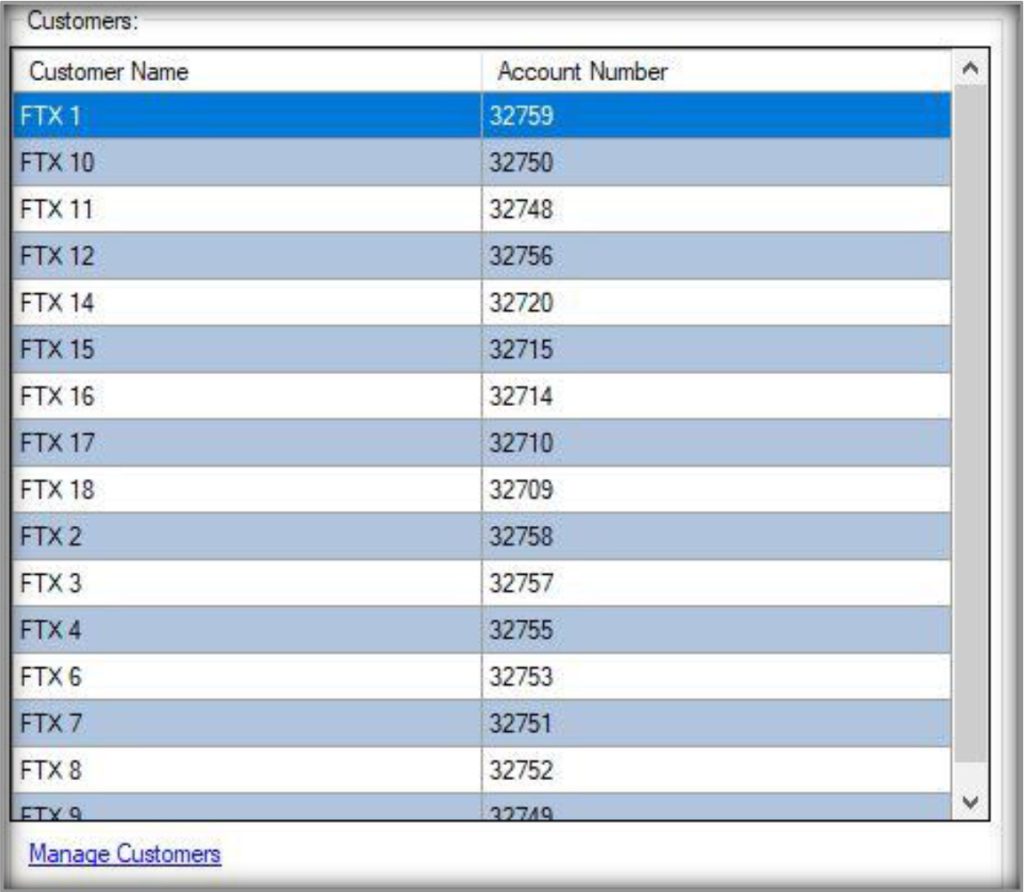
- To add accounts to the stamp click on “Manage Customers” in the customer section of the page
- Here you can add a single account, add by account group, or add by state
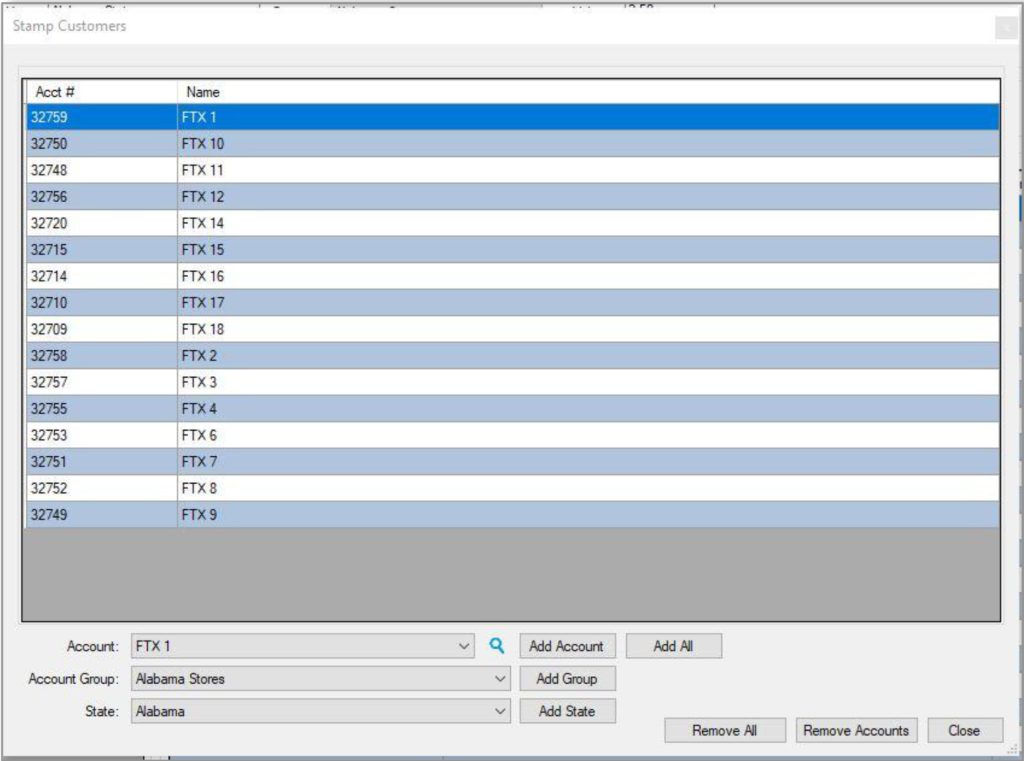
- Once you select the account, account group, or state click the appropriate add button
- You will now have those accounts you just added show in the customers section
- To add a vendor part, click add part
- Enter the vendor, part number, part cost, number of units, and click save
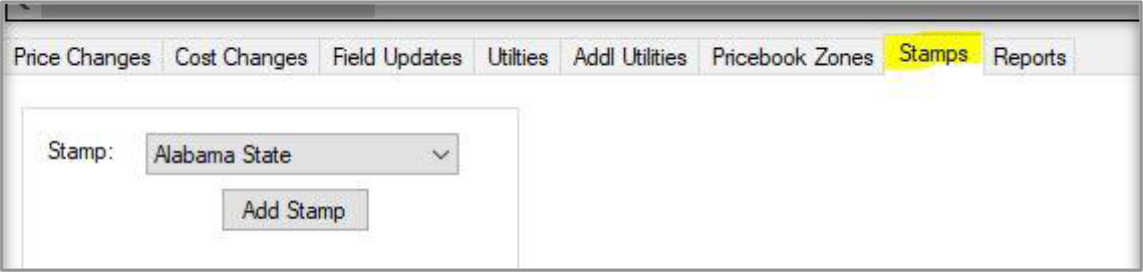
- To add items to the stamps, go to Mass Updates and choose the Stamps tab
- Filter to the category that has the items to be added
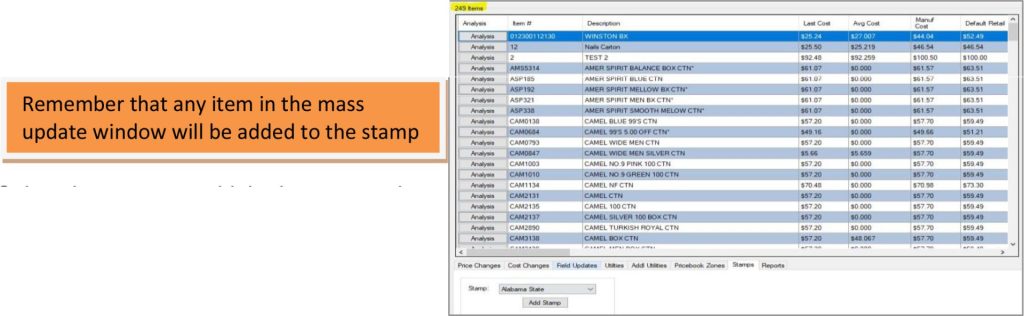
- Select the stamp to add the items to and click “Add Stamp”
ACCOUNT GROUPS
- Click Add Group

- Enter the group name
- Select the appropriate price list from the drop down menu
- Click Save Group
ACCOUNTS

- Click Add Account
- Enter the Account Details
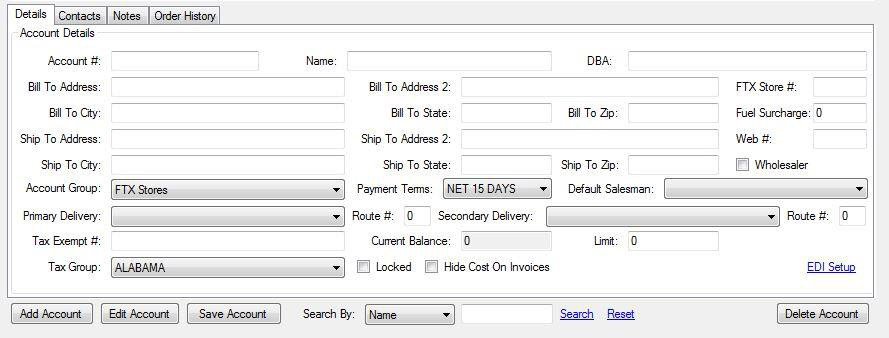
- After all the details are entered click on the Contacts tab
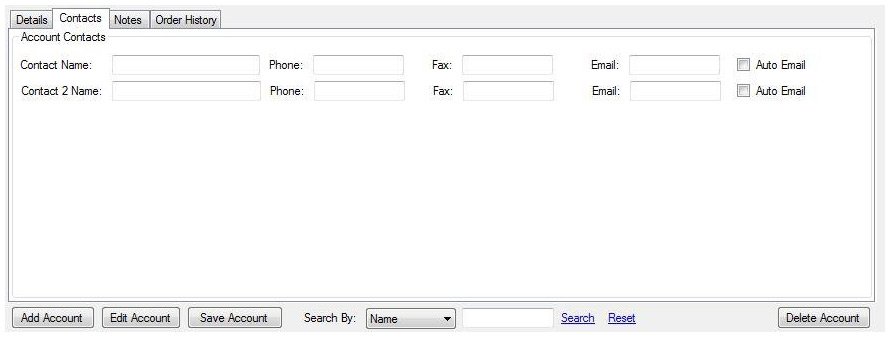
- Enter the contact information for this account
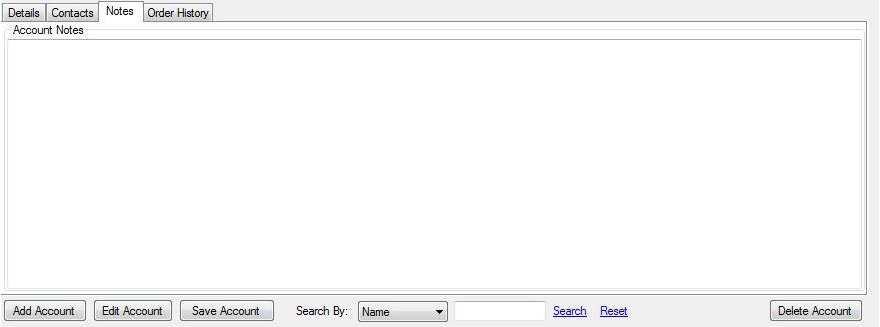
- The Notes tab allows you to enter notes for this specific account
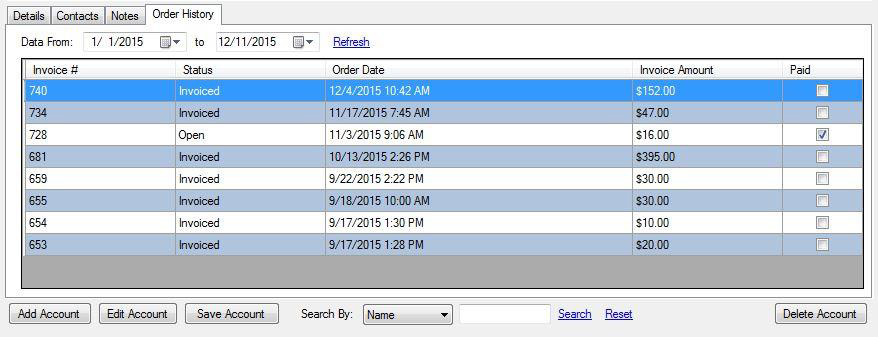
- The order History tab will allow you to see previous invoices for this account
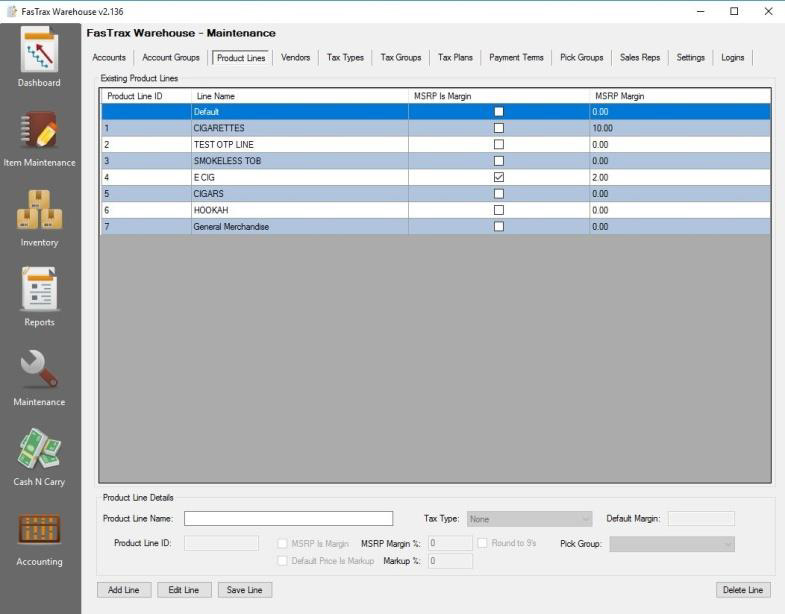
PRODUCT LINES
- Click “Add Line”
- Enter the name of the product line.
- Select the tax type
- Enter the Default margin for the product line.
- Click on “Save Line”
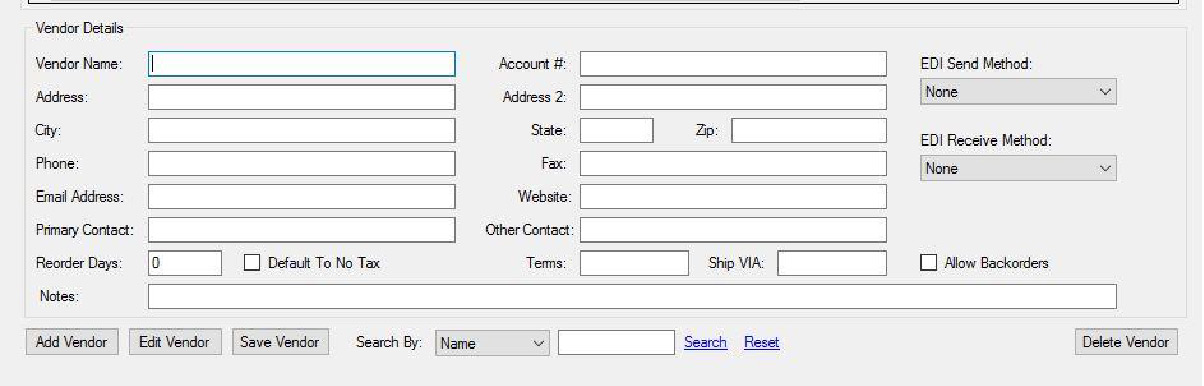
VENDORS
To add new vendors
- Click “Add Vendor”
- Enter all applicable information (vendor name, address, primary contact, ect…)
- Click “Save Vendor” once finished with step 2
TAX TYPES
- Click Add Type
- Enter the name for the tax type
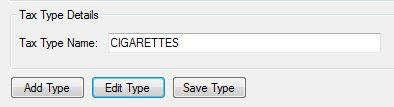
- Click Save Type

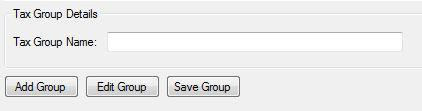
TAX GROUPS

- Click Add Group
- Name the Tax Group
- Click Save Group
- Continue until you have all your tax groups created.
TAX PLANS

- Click Add Plan
- Enter the name of the tax plan
- Set the tax plan type

- Set the tax plan value
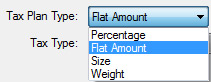
- Select the tax group the plan will belong to
- Select the tax type
- Click Save Plan

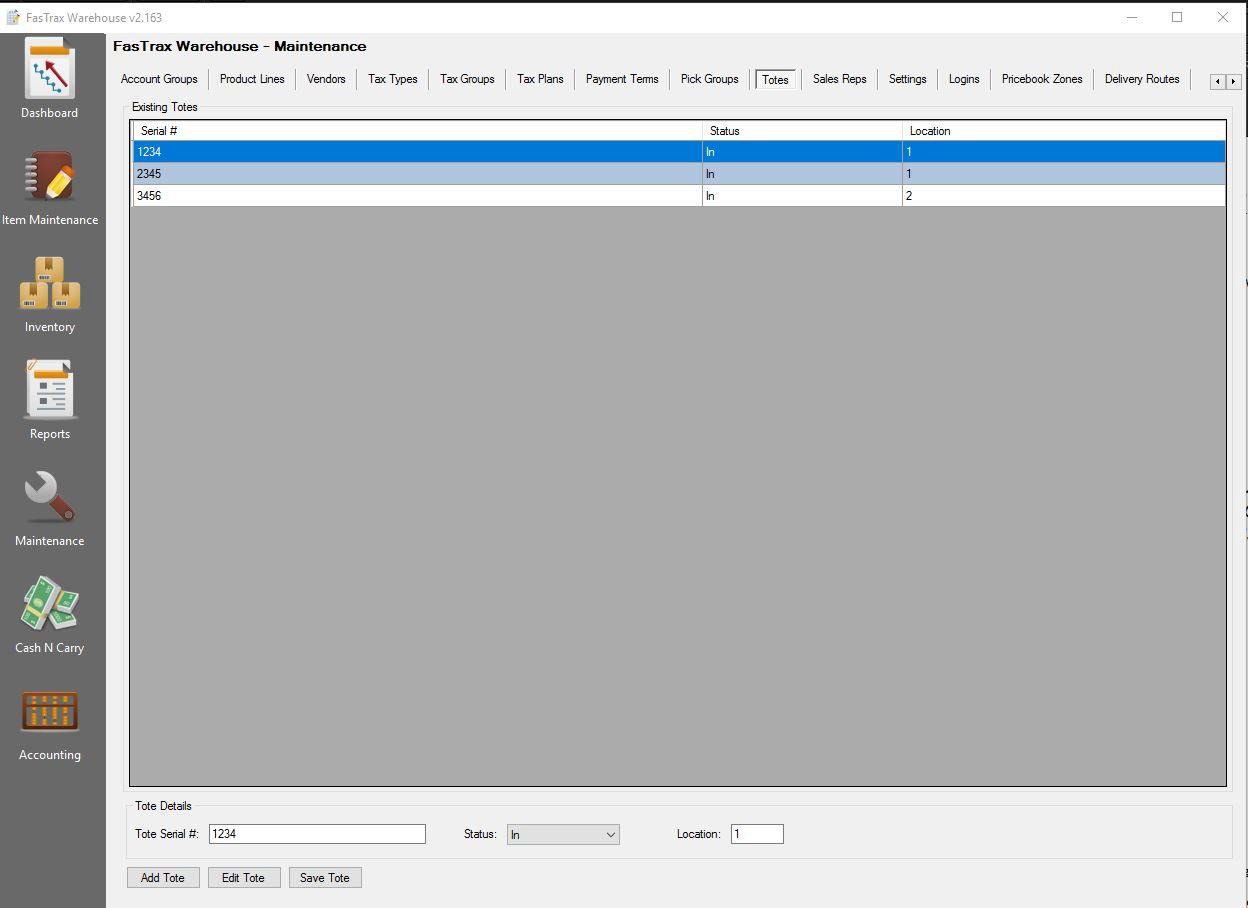
TOTES
- Click the add tote button to create a new tote
- Enter the serial number for the tote
- Enter the location of the tote
- Click save tote
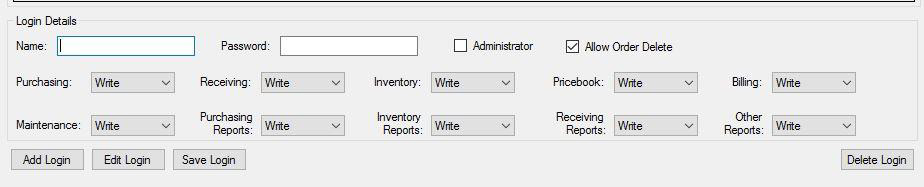
LOGINS
- Click “Add Login”
- Enter Name, password, and set permissions (give users read, write or no permissions for each field.)
- Click “Save Login” once step 2 is complete.
PRICEBOOK ZONES

- Click Add Zone
- Give the new zone a name (you can also set up different colors for different zones)
- Click Save Zone

- To add an account to the pricebook zone; go to the accounts tab.
- Select to edit the account and go to the “Other” tab.
- Check the box to Add to Pricebook Zone and select the zone.

- Save the account

- Go to Item maintenance and look up the item
- Under cost information click on the link for PB Zones
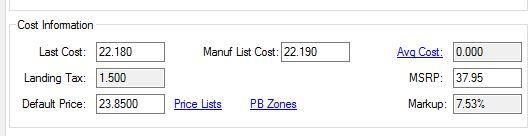
- Select the Pricebook Zone to use and set the price for the item.
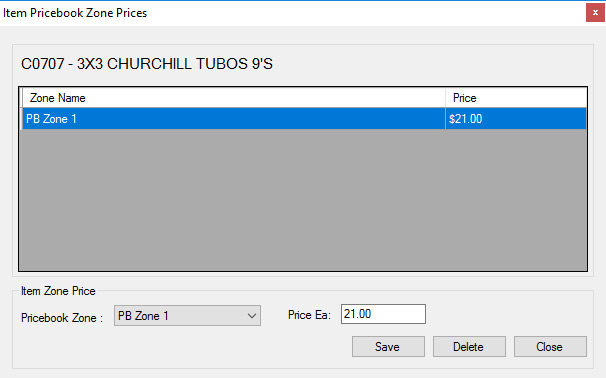
- Save the price for the pricebook zone

- Under mass updates, go to the Pricebook Zones tab
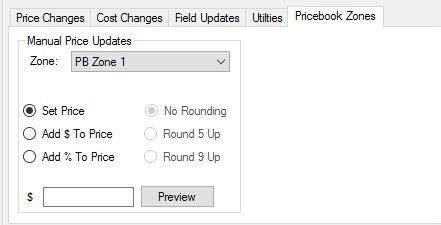
- Filter to the items you want to add to the pricebook zone (Remember that all items that show in the window will be affected)
- Set the price and then click preview
- Click Apply Changes to save
DELIVERY ROUTES
- Click new route

- Enter the route name
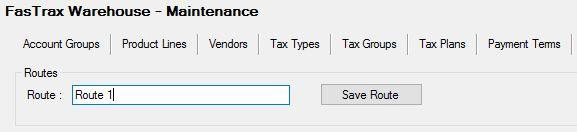
- Click Save route

- Select the customer name

- Click add customer to route
- That customer now shows on the route.
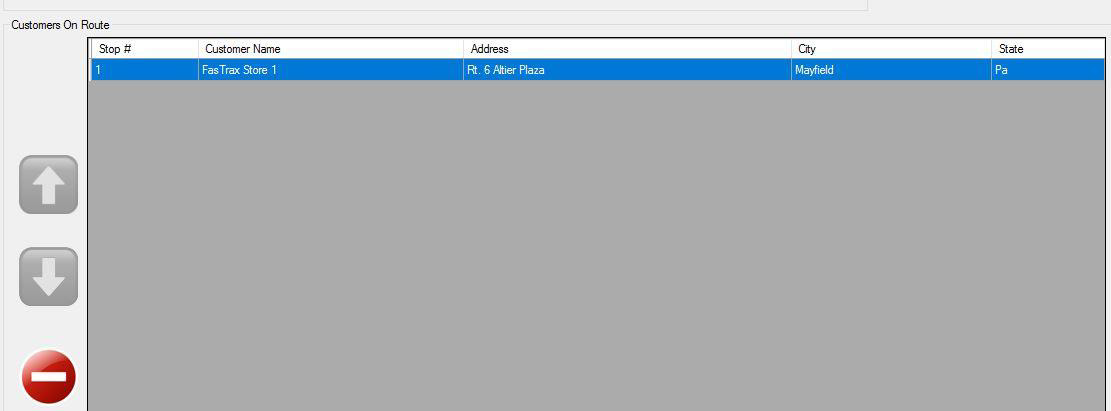
- After adding more customers you can change their stop number order by highlighting the customer and clicking the up and down arrow.
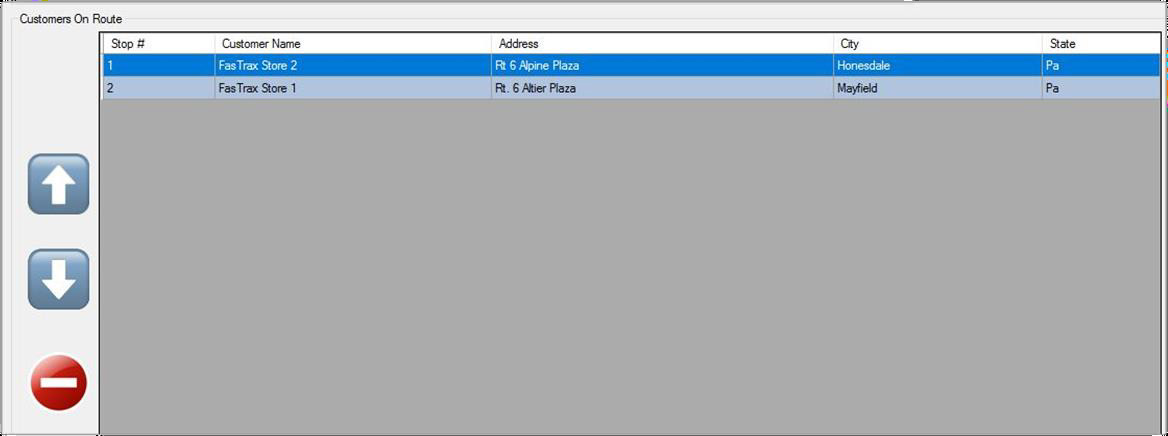

- Highlight the customer
- Click on the red button

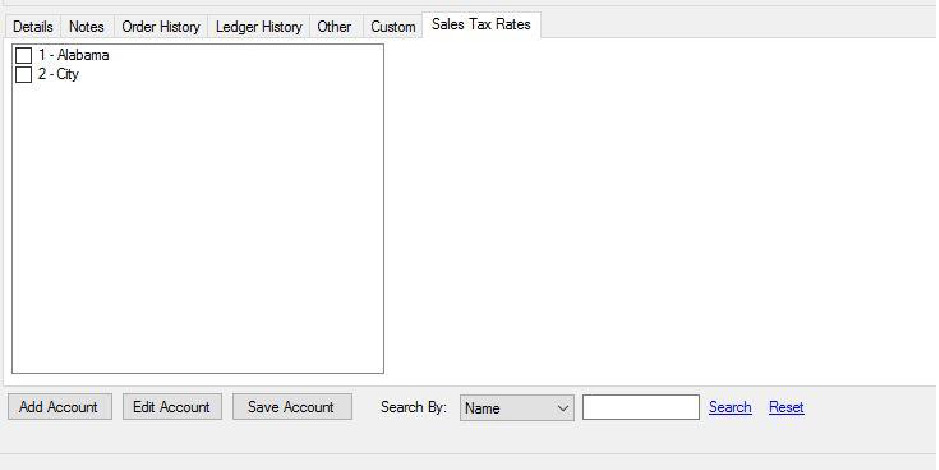
SALES TAX RATES
- Click Add Rate

- Enter the Name for the tax rate.
- Enter the amount for the tax rate.
- Click save rate
- To apply the sales tax rate to an account go to the Accounts tab in Maintenance
- Select the account
- Click edit account
- Go to the “Sales Tax Rate” tab on the bottom portion of the screen.
- Select the tax rate to apply to this account.
- Click “Save Account”
Tax Types
Create Tax Types
- From Maintenance, click Tax Types
- Click Add Type
- Enter the name of the new tax type (Cigars, Cigarettes, etc.)
- Click Save Type
Create Tax Groups
- In Maintenance, click on the Tax Groups tab.
- Click Add Group
- Enter the new tax group name (generally states you sell to)
- Click Save Group
Create Product Lines
- From Maintenance, click on the Product Lines tab
- Click Add Line
- Enter the name of the product line
- Choose the tax type from the drop down list
- Click Save Line
Create Price Lists
- From Item Maintenance, click on the Price List tab
- Click Add
- Enter the name of the price list and click OK
Create Payment Terms
- In Maintenance, click on Payment Terms tab
- Click Add Term
- Enter the term name
- Click Save Term
Create Account Groups
- From Maintenance, click on the Account Groups tab
- Click Add Group
- Enter the group name
- Select the price list from the drop down list
- Click Save Group
Create Accounts
- From Maintenance, click on the Accounts tab
- Click Add Account
- Enter the account number, account name, and address.
- Select the account group from the drop down list
- Select the payment terms
- Select the Default Salesman for the account
- Set the primary and secondary delivery dates.
- Select the tax group for the account (If there are not 2 taxes, then tax group 2 will be “NONE”)
- Click Save Account